Category Archives: Recipes

Freshman Brisket on the BGE

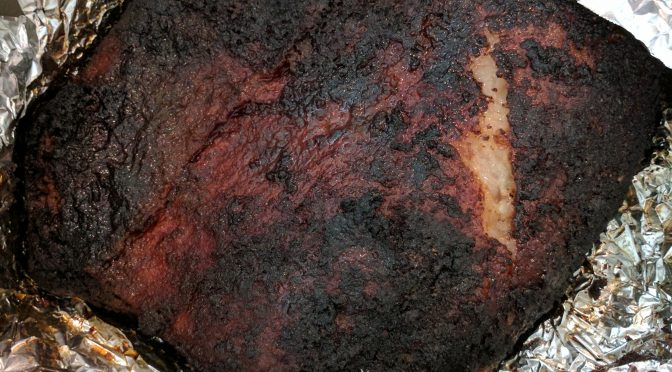
We gave smoking a brisket a try on the Big Green Egg this weekend. It was our first attempt at smoking Texas brisket in a BGE. The results were tasty, but not close to the ideal Texas texture and flavor we were hoping for. A few issues marred our attempts, but the man was staunch about doing it his way. He did spend a good 8-10 hours at it, but the end result was undercooked. We learned a great deal about how the Big Green Egg did a better job of maintaining temperatures over long cook times.

A salt rub the night beforehand is key to investing a brisket with flavor, and something I’ve learned to do during my smoke experiments with the Weber kettle. Previously, I did my dry brine and rubs in one step, then let the brisket rest overnight before hitting the grill.

Using a combo of pecan and oak lump, my man finished his brisket at 198F, which seemed too low to me. The dome temp on the BGE never exceeded 270F at its highest, and remained mostly on or below 250F. Unfortunately his coals did die out within the first 4 hours of the smoke, and he failed to use the convEggtor indirect heat plate during that time. So while the brisket nearly approached the right color, it just didn’t have enough time or strong heat to form a good  crust.

The result was a mildly smoked, slightly chewy piece of roast beef that needed an electric knife for slicing. It was a decent freshman effort, and I have a nice flat to use in my brisket chili recipe.
Recipe: Garlic Parmesan Shredded Chicken with Shiitake and Mukimame

What to do with leftover rotisserie chicken? I needed something quick and easy to fix, while utilizing a package of shiitake mushrooms that were languishing in my fridge. Good thing I still had a bag of frozen mukimame ready to go. And I really was looking forward to using the garlic parmesan olive oil I picked up at Scarborough Faire.

  • 16oz frozen mukimame
  • 12oz roasted or rotisserie chicken, meat and skin, shredded
  • 11.5 oz sliced​ shiitake mushrooms
  • 3oz raw garlic, chopped, minced
  • 1 tablespoon garlic powder
  • .25 tsp sea salt
  • 1oz extra virgin olive oil
  • 1oz Garlic Festival Garlic and Parmesan infused olive oil

Over medium heat sauté the raw garlic in extra virgin olive oil until fragrant. Add the shiitake mushrooms and season with salt. Toss until mushrooms have softened. Empty bag of frozen mukimame into pan and stir the mixture until heated through. Finally, add the shredded chicken, then drizzle with garlic parmesan olive oil.

To serve, sprinkle parmesan shavings over a four ounce portion. Feel free to drizzle on more garlic parmesan olive oil. For a little heat, add a dash of red pepper.

Nutrition calculator:
Calories 97 (per 2oz serving)
Total Fat 5.9 g
Total Carbohydrate 5.9g
Dietary Fiber 1.9 g
Sugars 1.1g
Protein 6.5 g

Recipe: Basic Bone Broth

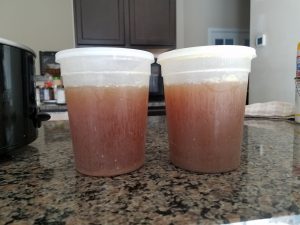
I’ve been having a blast lately making soups with my homemade bone broth, mostly derivations of Vietnamese pho, minus the banh (or rice noodles). It made for a more mindful and healthier start to 2017.

Bone broth is so easy to make, it makes me wonder why I ever bothered buying cartons of the store-bought stuff (e.g., convenience). But studies have revealed the healthy benefits of collagen, gelatin and all the minerals and electrolytes that go into bone broth (hello, gut health, reduced inflammationalleviating joint issues, hydration for post-workout and the list goes on) that it’s an easy decision to skip the commercial boxed or bouillon types.

So for my very first bone broth (back in April 2016) I needed only 3 ingredients: about 3 pounds of center-cut grass-fed beef marrow bones (found at Whole Foods Market), 2 tablespoons of apple cider vinegar, and enough water to fill a 5 quart slow cooker.

Dump all ingredients in the pot and cook low and slow (BBQ types know this phrase well enough) for 12-24 hours.

Now because these bones were sourced from Whole Foods, they were relatively picked clean and “not so scummy/bloody” while they rendered out during the slow cooking process. Some food blogs suggest parboiling before simmering the rest of the cook time. But, in future posts, I tried different cuts of meat and bone with the result of a less transparent broth. Nevertheless, in all endeavors, it was worth getting a mini fine-mesh strainer with rubberized silicone handle to stream the liquid through as I prepped the broth for storage. Obviously, I didn’t want to refrigerate anything suspended in the broth that risked altering the flavor in the long term.

Yep, there’ll be a small amount of fat in this collagen-rich broth. It’s part of what gives this broth that mouth-coating feel when sipped straight out of the cooker. Some folks can’t tolerate it which is why I suggest storing the broth in the refrigerator overnight, then removing the fat that gels on top of the broth the next day. SAVE THAT FAT, though! Store it in the refrigerator and use it in sautes and stir fries later!

If you’re curious, this is an unseasoned broth so it will taste bland right out of the slow cooker. I intended to use it as a base for other dishes like stews and sautes.

Thanks to Nom Nom Paleo, Wellness Mama and The Kitchn that shared instructions and plentiful tips on how to make and store bone broth.

Recipe: Lamb Meatballs in Pumpkin Marinara

I had leftover pumpkin from my blondie recipe so I had to find a creative use for it. A coworker previously mentioned adding pumpkin to spaghetti sauce for extra fiber, and it sounded like a great idea. The natural sweetness of the pumpkin will take the edge off the acidity, while adding a little volume to the sauce.

This recipe provided an opportunity for me to clear out some fridge space as well. We had ample leftovers of bbq sauce and spaghetti sauce that needed to be used. About the only thing that I needed to purchase was the ground protein and the cheese; I stocked everything else in my pantry.

You’ll also notice that these meatballs are grain-free…no breadcrumbs. In the cooking instructions, I explain how to keep the meatballs together while it slow cooks. It does take an extra cooking step, but the results are worth it!

  • 8 oz(s), Canned Pumpkin
  • 4 fluid ounce, Bbq Sauce
  • 8 fluid ounce, chunky garden (tomato, onion & garlic) spaghetti sauce
  • 1.50 oz(s), Garlic, raw
  • 13.50 ounce, Onion
  • 2 ounce, Kraft Parmesan Finely Shredded
  • 56 g, 2% Mozzarella shredded
  • 0.50 tsp(s), Spices, ground cumin
  • 2 tsp(s), Spices, chili powder
  • 1 tsp, ground, Spices, pepper, black
  • 1 tsp(s), Spices, parsley, dried
  • 1 tsp, leaves, Spices, basil, dried
  • 1.75 cup (121 g), Diced Basil, Garlic, & Oregano Canned Tomatoes
  • 1 egg, jumbo egg
  • 2 Tbsp (14g), Coconut Oil (Virgin, Unrefined, Cold Pressed)
  • 0.25 tsp, Sea Salt
  • 16 oz, Ground Chuck Beef 90/10
  • 16 oz, Ground Lamb

Add half of the dried spices, pumpkin puree, bbq sauce and spaghetti sauce to a slow cooker turned to high. While these ingredients start simmering, warm coconut oil in a saute pan over medium heat.

Chop the onions and garlic, add to saute pan. Cook until translucent and aromatic about 3-5 minutes. Take off heat and add 3/4 of the garlic/onion mix to the slow cooker, reserving the rest for meatballs.

Meanwhile, mix beef, lamb, egg, cheese, and half of the dry spices in a bowl and knead until thoroughly incorporated. Add the garlic/onion mix and continue to knead. Divide into 12 portions and hand-form the meatballs.

Add meatballs to heated saute pan or cast iron skillet and sear on all sides. The idea is to sear the outside but not cook the meatballs through. Transfer meatballs to slow cooker, taking care to drain fat.

Cook low and slow over low heat for 1-2 hours in the slow cooker.

Yields 12 meatballs + sauce. My preferred serving size is 2 meatballs, garnished with chopped green onions.

IMG_20160826_231056321

Nutrition calculator:
Calories 291 (per meatball/sauce)
Total Fat 17 g
Total Carbohydrate 16 g 5 %
Dietary Fiber 2 g
Sugars 9 g
Protein 19 g

Recipe: GF Pumpkin Walnut Blondie

Earlier this summer I experimented with a gluten-free dream bar/coconut bar recipe that used a homemade condensed coconut milk sweetened with stevia. Sadly, I didn’t consider it a success as it didn’t really have the sweet, rich, mouth-coating flavor that I associated with dream bars. I also mistakenly added baking chocolate to the bar which made it hard to eat.

In researching ways to tweak the dream bar recipe, I stumbled upon a paleo-friendly recipe for pumpkin blondie,  using almond butter to achieve the moist chewy texture that I was looking for.

Before I embark on testing the concept with my cococonutty dream bar recipe, I recreated the pumpkin blondie to make it gluten free and with walnuts. I also went with coconut sugar instead of stevia to see how I would like it. And you know what, it turned out great!

  • 0.50 Tsp, Cinnamon
  • 0.50 tsp, Baking Soda
  • 0.50 tsp, Spices, pumpkin pie spice
  • 3 tbsp(s), Chopped Walnuts
  • 180 gram, 100% Pure Pumpkin Puree
  • 96 gram (2 tbsp), Almond Butter, Smooth (unsweetened)
  • 2 tsp, Pure Vanilla Extract
  • 0.50 tsp, Baking Powder
  • 96 gram, Gluten Free Multi-purpose Flour (King Arthur)
  • 2 tablespoon (21g), Organic Wild Forest Raw Neem Honey
  • 18.75 tsp, Coconut Sugar

Preheat oven to 325F.

Line an 8×8 baking pan with parchment paper and grease with a little bit of coconut oil. I left some paper overhang on my pan so that I could easily lift the blondies out.

Warm the honey and almond butter in a microwave-safe bowl, then add to a stand mixer.  With the mixer on low speed, add all wet ingredients and mix until incorporated.

Meanwhile, sift cinnamon, baking soda, pumpkin spice, baking powder, gluten free flour and coconut sugar in a bowl. Then slowly add these dry ingredients to the stand mixer, and continue to mix, scraping the sides of the bowl every once in awhile.

Pour batter into the pan, and smooth until even. I prefer jiggling the pan until the batter is level. Sprinkle chopped walnuts over batter, then place into oven to bake for 50-55 minutes. Remove from oven and let cool. Cut into 16 squares (I used a pizza cutter).

IMG_20160818_102521054

The recipe instructions explained the low-and-slow bake time to achieve different textures. The latter bake time resulted in a medium moist blondie that was soft in the middle, crispy at the edges. When I bake this again, I’ll be sure to try the shorter bake time for a softer finish.

Yields 16 bars.

Nutrition calculator:

Calories 97
Total Fat 4 g
Total Carbohydrate 14 g 
Dietary Fiber 1 g
Sugars 7 g
Protein 2 g