Category Archives: Recipes

The Fried Onion Experiment Part 1

Labor Day holiday weekend ended a five-day fast, followed by another 2 weeks of unrepentant feasting, with a couple days of fasting scattered in between. During this time, I spent a lot of hours in the kitchen testing recipes. If you’ve been on my Instagram feed, you’ve seen the outcomes of two weekends’ worth of BBQ: smoked “American” Wagyu brisket, pork belly burnt ends, and BBQ pork ribs (St Louis cut from Matador Meat & Wine and Back Loin from Kroger’s in-house brand). Not to mention the prime (Matador) and A-wagyu (A Bar N) ribeyes we grilled up in the intervening period.

Of course, the add-ons to these main dishes are generally what makes an entire meal complete and wholly satisfying. In my household, it’s usually some vegetable side dish (brussel sprouts, broccoli and cauliflower are the main draws). When we’re craving carbs, it’ll be some grain-based or starchy side dish (think corn, pasta or potato).

Personally, my fave accompaniment to any beef cut is a couple of raw sliced red onions. It helps lessens the intense fattiness of some cuts (roasted beef ribs and prime rib) while enhancing the beefy flavor of a well-graded cut. It’s my only “required” vegetable topping on a medium-rare burger–hold the lettuce and tomato please!

Alas, raw onion consumption isn’t recommended for post-dinner social or romantic encounters…it’s the resultant onion breath and digestive mishaps that cause many to avoid the raw version altogether. If it’s at all included in a dish, onions often always get cooked past recognition–stripped exclusively for flavoring–if not discarded entirely.

Let’s not forget the discomfort that comes with preparing onions either, pungent smells and eye tearing tend to be the biggest reasons why the onion goes underutilized in kitchens. Not to mention the possible emergency room visit when an unskilled knife is applied to an irregularly globed surface.

I can rant on about onions in general, but let’s focus on the purpose of this post: which is about my pursuit of the tastiest fried onion recipe.

The fried onion gets no love it seems. It’s rarely offered on or ordered from restaurant menus when it competes with other fried vegetables, most popular of which is the potato fry. There’s only one dish that immediately comes to mind when fried onions are involved and it’s the green bean casserole dish–an ubiquitous entry on many a Thanksgiving dinner menu. Frequently, the fried onions adorning the dish came already commercially pre-cooked, dispensed from a can. Or, even faked–think Funyuns!

My love of fried onions has me seeking out restaurants, sampling various cuisines, and testing myriad recipes looking for a favorite, and I’ve eaten enough of them to know they generally fall into 2 camps: battered or breaded. Then they’ll appear in one of 2 forms: rings or strings. Of consideration is the type of onion used, normally yellow or white.

The problems I’ve had with nearly every fried onion I’ve eaten are the tastes and textures. Oftentimes the onion flavor disappears and you end up eating a mouthful of doughy batter and tasteless breading. When it’s not overwhelmed by the coating, the onion itself tends to be devoid of pungent sharpness due largely to the market’s preferences for mild, sweet onions: less sulfur and mellow cultivars!

As you may know by now, my food preference skews towards the bold and the strong. An onion should have bite: sharp, pungent, stinging without brutally assaulting the senses (though I’d argue that the freshest, bestest eating onion should make you cry). I’d like the flavor to be a touch sweet, which is why I enjoy red onions most of all, striking a balance between pungent and sweet. Then there’s the shallot…well that’s all I gotta say about that.

For this experiment, we are starting with tapioca flour (or starch) as the coating. I’ve had very good success with shallow frying tapioca flour, which produces a crisp exterior. How it’s applied is via a 2-step method: egg wash then dredge. Then the onion rings are deep fried in peanut oil between 350F to 375F.

The result is a crispy onion ring, if a little bland. I prefer to toss them in a stainless steel bowl and season them with a little salt and pepper. I also tried sprinkling parmesan over a small batch (anybody remember JT Mccords)…delish!

Stay tuned for my next fried onion experiment to take a stab at a different flour/coating.

Recipe: Smoked Glazed Pork Belly (aka Pork Belly Burnt Ends)

The Labor Day weekend is summer’s last bow before fall arrives, and the holiday is usually marked with backyard cookouts across the US, involving grills and smokers.

My household planned on staying home during the weekend, spending some intimate time with the Big Green Egg XL…and I wanted to do something different with pork belly from my usual crispy smoked roast pork. I wanted something sweet, smoky…and spicy a la Sichuan style. And of course I’d heard of pork belly burnt ends so…

This here hunk of smoked pork belly with crisped skin…

…went back into the BGE with a generous application of my spice rub, along with helpings of butter, honey and brown sugar…

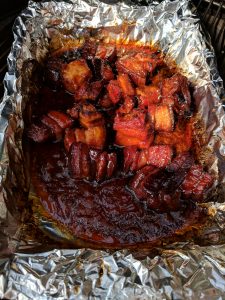
Which then turned into the sticky-sweet-and-savory pork belly dish below!

The only things I would have changed to this recipe: get a larger slab of pork and add some real heat–Sriracha or chili oil–to the glaze.  Oh, and I could’ve certainly used a lot less butter.

The recipe as is:

  • 6 tbsp salted butter (2 or 4 tbsp would be less wasteful)
  • 3oz Neem honey
  • 3oz light brown sugar
  • 1-2oz of spice rub (I used my cajun rub)
  • about 3 lbs of skin-on, boneless pork belly
  • a bunch of green onions, sliced, for garnish (optional)

In contrast to some burnt end methods that I’ve read, we didn’t cut or rub the pork belly before the smoke. We slapped the raw, uncut and unadorned pork belly onto the BGE to smoke at 300F (over hardwood coals and post oak logs) for about 15-20 minutes. We then applied direct heat to the skin for another 5-10 minutes to get crispy.

After pulling it off the smoker to slice and cube, I tossed the pork belly chunks in a foil pan with the glaze ingredients.  Then back onto the BGE they went for another 10-15 minutes to caramelize.

Once the pork belly got sticky and a little blackened, I pulled the pan from the smoker and let it sit while I chopped up the garnish.

It was mighty hard sneaking bites in of the hot bits of pork…but it was soooo delicious!

Recipe: Dry Spice Rubs and Mixes

There’s nothing more indispensable than a simple spice blend of salt and pepper (and garlic powder if you’re in my household) to season every dish: raw, grilled, broiled, roasted, seared, stewed, sauced, you name it.

When it comes to letting quality ingredients–meats and vegetables–shine, simple spice mixtures are usually best. These spice rubs are my go-to when roasting, grilling and smoking healthy.

S&P: Salt & Pepper

  • sea salt or, even better, Himalayan salt
  • fresh cracked black peppercorns

You dropped a hunk o’ change on that choice- or prime-cut of steak! Salt and pepper about 20 minutes before you grill premium quality meats to give the salt a chance to draw out the moisture and intensify the flavor. S&P is so basic yet it’s the best and simplest way to savor grass-fed, free-range, exotic meats and seafood.

Citrus & Herb:

A citrus-y component …

  • orange peel
  • lemon peel
  • lemon or lime basil
  • lemon  or orange thyme
  • lemon balm
  • lemon verbena
  • lemongrass (ground or pounded)

Plus an earthy or woody herb …

  • rosemary
  • oregano or marjoram
  • thyme
  • sage
  • chives
  • basil (non-citrus varieties)

Brightens any veggie, meat or seafood dish, especially if pan-searing, grilling or roasting.  Since I grow many of these herbs in my garden, it’s a great way to take utilize ingredients at its freshest.

GM: Garam Masala

  • 1 tablespoon ground cumin
  • 1 1/2 teaspoons ground coriander
  • 1 1/2 teaspoons ground cardamom
  • 1 1/2 teaspoons ground black pepper
  • 1 teaspoon ground cinnamon
  • 1 tsp chili powder
  • 1/2 teaspoon ground cloves
  • 1/2 teaspoon ground nutmeg
  • 1/2 tsp ground ginger
  • 1 bay leaf (crushed)

While it’s used to season curries and stews in Indian cuisine, garam masala is a versatile spice mix. Works best with any truly bland vegetable, like cauliflower, or protein, like fish. Use it to spice up a baked potato or a grilled avocado. It’s a great way to liven up any dish and give it an antioxidant punch at the same time.

Cajun/Blackening Spice:

  • 2-3 tablespoons paprika
  • 2 tablespoons chili powder
  • 1 tsp red pepper flakes, ground cayenne, or a dash of ghost pepper
  • 1-2 tablespoons garlic powder
  • 1 tablespoon onion powder
  • 1/2 to 1/4 teaspoon sea salt
  • 1 teaspoon oregano
  • 1 teaspoon basil (optional)
  • 1 teaspoon cumin (optional)
  • 1 tablespoon ground black pepper
  • 1-2 tablespoons brown sugar

I originally created this spice mix for blackening fish, chicken and steaks in butter. But I’ve found that it does extremely well for direct grilling and searing all types of  protein, especially pork belly! Tweak the spice levels by increasing or reducing the amount of cayenne/red pepper. For a really spicy punch, use ghost pepper!

Engineering the roasted vegetable

A few weeks ago I was admiring a deep roasting pan of chopped bell peppers, sliced onions and baby bella mushrooms on its way into my hot oven, to be roasted–at least I imagined–to the perfect burnished caramelization that I’d come to expect of roasted root and cruciferous–of the brassica persuasion–veggies.

Like the batch of shishito peppers that preceded it, drizzled with a bit of extra virgin olive oil, a squeeze of lemon juice and sprinkled with garlic powder. Yum!

Of course, I quickly got over my naive enthusiasm as the clock ticked away the minutes while I watched in dismay as my prepped veggies slowly cooked into a mushy death in the hot hell of the oven. Dreams of pairing these veggies with my mesquite smoked chicken breast and cajun spiced smoked pork belly evaporated.

I’d forgotten the lessons I previously learned in achieving the color, texture and taste that I’d come to love of roasted al dente veggies, especially after figuring out how to produce perfectly crisp and tender cauliflower florets.

  1. High heat: To achieve crispness and browning on the outside and tenderness on the inside, roast at minimum temperatures of 400F. As you approach 500F, you will need to keep a watchful eye to make sure you don’t burn the veggies to a crisp.
  2. Air dry: After rinsing vegetables before chopping and slicing, be sure to let them air dry completely. This is especially valid when batch roasting veggies, where moisture risks getting trapped in pockets, steaming the veggies instead of roasting.
  3. Cut/chop/slice and space evenly: Denser vegetables, especially root veggies, do well when the pieces are relatively equal size, 1-2″ chunks. Veggies that contain more water or whose cell walls collapse (soften) sooner under high heat will do better if cut into larger wedges…or are better suited to a cast iron sear or flame grilling. Achieve more “even” cooking if veggies have more “air space” around them, especially leafy veggies.
  4. Salt after: Seasoning with salt releases water while cooking. Soft-walled vegetables are particularly vulnerable.  Use a pinch or omit salt completely when seasoning veggies going straight into the oven. After all, salt can always be added AFTER the cook.

Follow these basic lessons, and you’re almost always going to achieve lovely roasted tender-crisp veggies. There are other aspects to successful vegetable roasting–such as cookware and storage–but that’s the subject of another post. There are many more internet articles on this topic if you’re looking to refine your technique.

That’s not to say that soft, mushy roast veggies don’t have a purpose. Roasted garlic and onions can be pureed and make a terrific base for a savory broth or soup!

Recipe: Brisket Jalapeno Chili

I forgot to post my brisket chili recipe last week, since getting wrapped up in chasing down issues with my web hosting (AWS and GCP). I’m not even sure I remember the ingredients any more, but technically you can follow my original Slow Cooker Jalapeno Chili recipe and get about the same results. After all the prep work, the slow cooker does all the cooking for you.

So I’m just going off memory but here are the ingredients:

  • 4lbs smoked flat of brisket
  • 10oz, Onions, raw
  • 56g, Garlic, raw
  • 5-6oz, Peppers, jalapeno, raw, some seeded, some pan roasted
  • 6oz can (10 tbsp ea.), Tomato Paste
  • 2 or 3 14.5oz can (1 4/5 cups ea.), Fire Roasted Diced Tomato
  • 6 fluid ounce, Water – Municipal or beef browth
  • 1 tbsp, Spices, chili powder
  • 1 tbsp, Spices, onion powder
  • 1 tbsp, Spices, garlic powder
  • 2 tbsp, Spices, paprika
  • 1 tbsp, Spices, cinnamon, ground
  • .50 tbsp, Dark cocoa powder unsweetened
  • .50 tbsp, Spices, pepper, black
  • 1 tsp, Spices, pepper, red or cayenne
  • 4oz Trader Joe’s Sriracha and Roasted Garlic BBQ Sauce
  • dash of ghost pepper spices
  • 2 tbsp extra virgin olive oil

After chopping garlic and onions, I sweated them briefly in a pan with some EVOO. I tossed those into a 5-6qt slow cooker, along with fresh chopped jalapeno chunks. I reserved 2 of the jalapenos and pan roasted them until their skins blistered, before chopping those up and including them in the mix.

As you may recall the flat of brisket was part of a whole packer we previously smoked. Since it tends to be lean and tougher than the point, the flat end of the brisket is a pretty good candidate for slow cooking. I sliced it up in 1″ chunks and tossed it into the crockpot.

At this point I threw in the rest of the ingredients, though I’m having trouble recollecting if I added 2 or 3  cans of diced tomatoes. If you have a bigger slow cooker and don’t mind a more “wet” chili, go ahead and included the 3rd can. But I prefer mine more meaty and chunky, with less sauce in my chili.

Be careful with the ghost pepper seasoning; it can heat up a chili quite fast!