Tag Archives: healthy

Recipe: Basic Bone Broth

I’ve been having a blast lately making soups with my homemade bone broth, mostly derivations of Vietnamese pho, minus the banh (or rice noodles). It made for a more mindful and healthier start to 2017.

Bone broth is so easy to make, it makes me wonder why I ever bothered buying cartons of the store-bought stuff (e.g., convenience). But studies have revealed the healthy benefits of collagen, gelatin and all the minerals and electrolytes that go into bone broth (hello, gut health, reduced inflammationalleviating joint issues, hydration for post-workout and the list goes on) that it’s an easy decision to skip the commercial boxed or bouillon types.

So for my very first bone broth (back in April 2016) I needed only 3 ingredients: about 3 pounds of center-cut grass-fed beef marrow bones (found at Whole Foods Market), 2 tablespoons of apple cider vinegar, and enough water to fill a 5 quart slow cooker.

Dump all ingredients in the pot and cook low and slow (BBQ types know this phrase well enough) for 12-24 hours.

Now because these bones were sourced from Whole Foods, they were relatively picked clean and “not so scummy/bloody” while they rendered out during the slow cooking process. Some food blogs suggest parboiling before simmering the rest of the cook time. But, in future posts, I tried different cuts of meat and bone with the result of a less transparent broth. Nevertheless, in all endeavors, it was worth getting a mini fine-mesh strainer with rubberized silicone handle to stream the liquid through as I prepped the broth for storage. Obviously, I didn’t want to refrigerate anything suspended in the broth that risked altering the flavor in the long term.

Yep, there’ll be a small amount of fat in this collagen-rich broth. It’s part of what gives this broth that mouth-coating feel when sipped straight out of the cooker. Some folks can’t tolerate it which is why I suggest storing the broth in the refrigerator overnight, then removing the fat that gels on top of the broth the next day. SAVE THAT FAT, though! Store it in the refrigerator and use it in sautes and stir fries later!
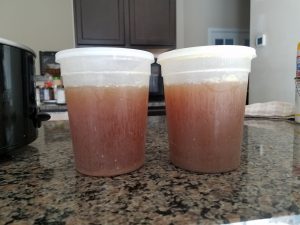
If you’re curious, this is an unseasoned broth so it will taste bland right out of the slow cooker. I intended to use it as a base for other dishes like stews and sautes.

Thanks to Nom Nom Paleo, Wellness Mama and The Kitchn that shared instructions and plentiful tips on how to make and store bone broth.

Recipe: Slow Cooker Jalapeno Chili

This slow cooked chili ambushed many at a workplace potluck lunch with its heat. The secret is leaving the seeds intact on 1 or 2 jalapeno peppers. Cumin powder lends a distinctive aroma to the chili. Additional heat furnished by chili powder, red pepper and a dash ghost pepper chili added to meat while browning in a pan.

  • 8 oz, Angus Ground Beef Chuck 80%/ 20%
  • 8 oz., Ground Lamb
  • 8 oz, Ground Pork – Fixed
  • 9 oz(s), Onions, raw
  • 56.00 g, Garlic, raw
  • 4.50 oz(s), Peppers, jalapeno, raw
  • 6oz can (10 tbsp ea.), Tomato Paste
  • 14.5oz can (1 4/5 cups ea.), Fire Roasted Diced Garlic Tomato
  • 6 fluid ounce, Water – Municipal
  • 1 tbsp, Spices, chili powder
  • 2 tbsp, Spices, cumin seed
  • 2 tbsp, Spices, paprika
  • 1 tbsp, Spices, cinnamon, ground
  • 0.50 tbsp, Spices, pepper, black
  • 1 tsp, Spices, pepper, red or cayenne
  • 8 oz, Fresh Lean Ground Turkey With Rosemary Extract
  • dash of ghost pepper chili

Over medium heat, lightly brown the meats in a skillet, season with spices to taste. Add to a preheated slow cooker. Using the fat/grease left over from the cooked meats, saute garlic and onions until aromatic, about 2-3 minutes, then add to the slow cooker. Toss in the remaining ingredients, then cook low and slow for 4 hours. Or cook on high for 2 hours.

Serving suggestion: serve warm over hard boiled eggs or egg bake. For my potluck lunch, it made for a spicy, meaty topping on burgers and hot dogs.

IMG_20160707_JalapenoChilionEgg

Yields about 78oz of chili.

MPF calculation per 2oz serving:
71 calories
Total Fat 4g
Total Carbohydrate 3 g
Dietary Fiber 1g
Sugars 1 g
Protein 5 g

Recipe: Spicy Primal Mayo Egg Salad

I decided to make this recipe after picking up a jar of Primal Kitchen Mayo over at Thrive Market. I’ve been meaning to whip up some deviled eggs, based on the smoky version at Lockhart Smokehouse. But this egg salad gives you more bang for buck–minus the smokiness. The ghost pepper chili flakes that I got from Trader Joe’s really gives this egg salad bite.  Despite that it’s paleo/primal, the egg salad passed the taste test at home.

  • 4 Extra Large Grade A Eggs, hard boiled
  • 8 Jumbo Grade A Eggs, hard boiled
  • 1 oz., Greek Yogurt
  • 5 Tablespoon, Primal Kitchen Mayonnaise Made W/avocado Oil
  • 1 tbsp, Spices, garlic powder
  • 2 tsp(s), Spices, chili powder
  • 2 tsp, ground, Spices, pepper, black
  • dash of sea salt
  • dash of ghost pepper chili pepper flakes

After hard boiling eggs and letting it cool, peel from shell and add to bowl. Use a spatula to break the eggs for a chunky texture. Fold in yogurt and mayo and continue to turn over gently. Season with garlic powder, chili powder, cracked pepper, sea salt, and ghost chili pepper.

IMG_20160710_PrimalEggSalad

If I were to add more protein to this egg salad, it would be ham or bacon. Or better yet, smoked brisket.

Yields about 30oz total, 2oz per serving.

MFP Recipe Calculator estimate per serving:
108 Calories
Fat 9g
Carbohydrate 1g
Protein 6g

Recipe: Bacon Broc Cheese Egg Bake

I really needed to do something with a bag of frozen broccoli cuts (not the tasty florets kind) stashed away in my freezer. Here’s a protein-packed and Primal-friendly breakfast and snack that I made with those cuts, courtesy of SkinnyTaste by way of MyFitnessPal’s blog.

I originally projected 8 whole eggs for this recipe, but realized I didn’t have enough egg mix to fill all 12 cups to the brim. (This was before I realized that the mix would rise as it cooked.) I didn’t whip the mix enough to let air in so I anticipated that there would be very little rise.

Egg Bakes Pour egg mix into non-stick pan

Hint: the horseradish cheddar that I used in this modified recipe really gives the egg muffins some bite! Were I to change anything to this current recipe, I would probably add more bacon!

  • 9 egg, Jumbo Eggs Grade A*
  • 4 pan fried slice, Thick Cut Bacon – Naturally Hickory Smoked
  • 4 oz, Extra Sharp Cheddar Cheese
  • 1.50 oz, Horseradish Cheddar Cheese
  • 1.50 oz, Cheese, gruyere
  • 1 container (348 gs ea.), Broccoli Cuts Frozen
  • 1 tbsp (9.7g), Spices, Garlic Powder
  • 0.25 tsp, Sea Salt
  • 0.50 tsp, ground, Spices, pepper, black
  • stick of butter for greasing pan

Broil or bake the bacon slices in a pre-heated oven at 350F.  (Or you can pan-fry the bacon.) Drain/blot grease and crumble bacon after cooking. Set aside.

Meanwhile, cook frozen broccoli per package instructions. Drain excess moisture, season with salt and pepper, and set aside to cool.

Prep a non-stick 12-muffin or cupcake tin by greasing each cup with butter.

Crack eggs into a mixing bowl. Shred the cheese and add to egg mixture. Slowly add broccoli cuts (make sure the broccoli is cooled so it doesn’t cook the egg mix), season with garlic powder and gently mix all ingredients until thoroughly incorporated. Ladle egg mix into muffin tin. Garnish the tops with crumbled bacon.

Bake @ 350F for 20-25 minutes. Best eaten when warm and gooey-cheesy in the middle. Dress with a little sriracha or salsa.

Some of my muffins overflowed their cups during baking, but it was an easy task to scoop them back into each mold. I likely didn’t need to grease the tin due to the non-stick surface; the eggs all popped out of their molds with very little effort.

Refrigerate leftovers in a sealed container.

MFP Recipe Calculator estimate per serving:
175 Calories
2g Carbs
12g Fat
12g Protein
1g Sugar
1g Fiber